
DIY Projects
DIY wall-mounted laundry hamper

DIY wall-mounted laundry hamper
DIY Projects
DIY wall-mounted laundry hamper
Managing editor and resident crafter
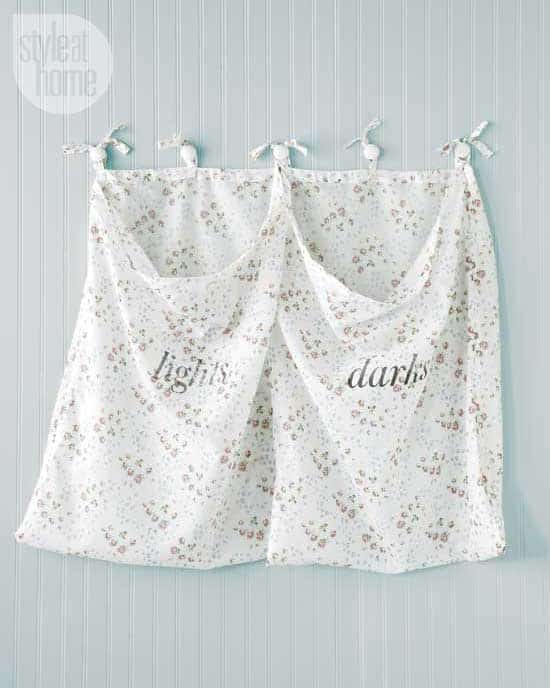
Catherine Therrien cleverly creates a wall-mounted
laundry hamper from an inexpensive – and charmingly pretty – drapery panel. A simple seam down the centre separates lights from darks.
Materials
Directions
1 Decide what you’d like written on your laundry bags. Follow the printing instructions on the package of your iron-on printer transfer sheets.
2 Fold a single drapery panel in half horizontally, lining up the outer edges. Sew the edges together with a basic straight stitch. Iron the seams.
3 Turn the drapery panel right side out. Mark the centre seam with pins and sew together. Iron the seam.
4 Mark each bag’s centre point and fuse the transfer sheets to the fabric, as per the package instructions.
5 Knot the ties and hang on the wall.
Materials
- Iron-on printer transfer sheets
- Inkjet printer
- Cotton drapery panel
- Sewing machine
- Iron
- Pins
Directions
1 Decide what you’d like written on your laundry bags. Follow the printing instructions on the package of your iron-on printer transfer sheets.
2 Fold a single drapery panel in half horizontally, lining up the outer edges. Sew the edges together with a basic straight stitch. Iron the seams.
3 Turn the drapery panel right side out. Mark the centre seam with pins and sew together. Iron the seam.
4 Mark each bag’s centre point and fuse the transfer sheets to the fabric, as per the package instructions.
5 Knot the ties and hang on the wall.
Comments