
Food & Drink
cake decorating: the petal cake

Food & Drink
cake decorating: the petal cake
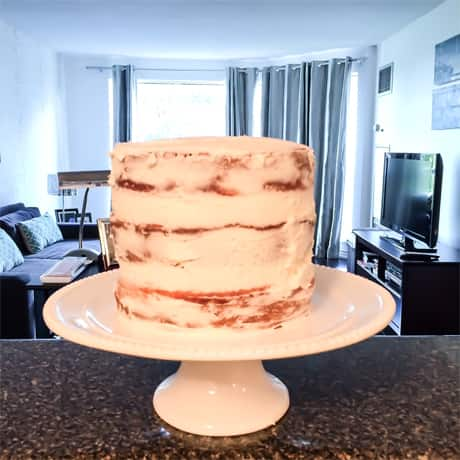
My lovely niece celebrated a milestone birthday last week. She turned one! Which meant that it was the perfect opportunity for me to try my hand at a new cake. I've tried the
ombre rose cake and the
pastel swirl cake but this time, I was eager to try the petal cake. As always, I spent hours researching this cake online. There are lots of blog posts out there with tips to help you perfect the look. And I also watched a few YouTube tutorials like this one from
Leslie Green and this one from
The Boy Who Bakes. Once I had done my research, it was time to get started! I used three cakes so that it would have enough height to show off the ombre effect. Once the cakes were baked and cooled, I gave the cake a crumb coat and let that set before starting with the petal cake icing technique. Here's how it looked with just the crumb coat:
 I learned a lot of things along the way, so here are some of my tips, if you're interested in giving this a go yourself. Note: The cake is Canadian Living's
Golden Layer Cake and the icing is also a tried and true Canadian Living recipe for
Vanilla Buttercream.
Icing decorating tips for making a petal cake -Decide how many colours you want to do. I did two rows of three colours but if you want to have each layer a different colour, you'll need to make more batches of icing, which is more time consuming. - I realized that I should have fully covered the whole cake with the crumb coat. Then you wouldn't have seen any little bits of cake peeking out. You'll see what I mean if you scroll down to the final cake photo. -The basic technique is simple. Just pipe a large dot onto the cake, then drag it with your offset spatula. (One of the videos I watched suggested using a small spoon to drag the icing after each dot. Instead, I used an offset spatula, which worked quite well.) Then pipe another dot and drag again. Do this all the way around the cake. -I realized as I was going that the dots weren't always in a perfect straight line so go slowly and pay attention to what you're doing. See how it's starting to slope downwards?
I learned a lot of things along the way, so here are some of my tips, if you're interested in giving this a go yourself. Note: The cake is Canadian Living's
Golden Layer Cake and the icing is also a tried and true Canadian Living recipe for
Vanilla Buttercream.
Icing decorating tips for making a petal cake -Decide how many colours you want to do. I did two rows of three colours but if you want to have each layer a different colour, you'll need to make more batches of icing, which is more time consuming. - I realized that I should have fully covered the whole cake with the crumb coat. Then you wouldn't have seen any little bits of cake peeking out. You'll see what I mean if you scroll down to the final cake photo. -The basic technique is simple. Just pipe a large dot onto the cake, then drag it with your offset spatula. (One of the videos I watched suggested using a small spoon to drag the icing after each dot. Instead, I used an offset spatula, which worked quite well.) Then pipe another dot and drag again. Do this all the way around the cake. -I realized as I was going that the dots weren't always in a perfect straight line so go slowly and pay attention to what you're doing. See how it's starting to slope downwards?
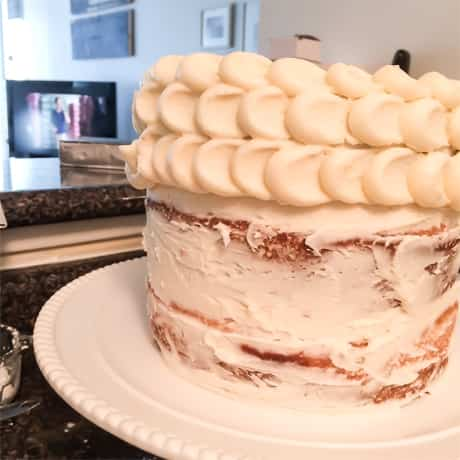 -Wipe the back of the spatula after each drag to get a cleaner look. I read that you can dip the spatula in hot water to clean it and that that should give you a smoother drag but that didn't really work for me. I think my spatula was too wet so it made the buttercream goopy. I just wiped it on a tea towel after each drag. -For this technique, I used the Wilton 806 tip which is a plain round tip. It worked perfectly. One website suggested filling a Ziploc bag with icing and cutting off the tip for a makeshift icing bag. It looked like it worked well for the woman in the video but I prefer the Wilton icing bag and tip as the bag is much larger and can hold more icing. Here's the final product. What do you think?
 I iced this cake right on the cake pedestal so I wouldn't have to move it. It worked fine since you can easily rotate the cake as you go. This technique is not difficult. The best advice I can give you is to give yourself plenty of time. Don't be in a rush because this technique is time consuming. Block off some time so you can settle down to the task of icing your cake without feeling rushed. I was really pleased with the results but since I learned so much along the way, I'm eager to try it again to make it even better. When I saw my beautiful niece with her first birthday cake, I knew it was all worth the effort and she didn't seem to notice any flaws!
 Have you ever tried the petal cake? What's your favourite way to decorate a cake?
I learned a lot of things along the way, so here are some of my tips, if you're interested in giving this a go yourself. Note: The cake is Canadian Living's
Golden Layer Cake and the icing is also a tried and true Canadian Living recipe for
Vanilla Buttercream.
Icing decorating tips for making a petal cake -Decide how many colours you want to do. I did two rows of three colours but if you want to have each layer a different colour, you'll need to make more batches of icing, which is more time consuming. - I realized that I should have fully covered the whole cake with the crumb coat. Then you wouldn't have seen any little bits of cake peeking out. You'll see what I mean if you scroll down to the final cake photo. -The basic technique is simple. Just pipe a large dot onto the cake, then drag it with your offset spatula. (One of the videos I watched suggested using a small spoon to drag the icing after each dot. Instead, I used an offset spatula, which worked quite well.) Then pipe another dot and drag again. Do this all the way around the cake. -I realized as I was going that the dots weren't always in a perfect straight line so go slowly and pay attention to what you're doing. See how it's starting to slope downwards?
-Wipe the back of the spatula after each drag to get a cleaner look. I read that you can dip the spatula in hot water to clean it and that that should give you a smoother drag but that didn't really work for me. I think my spatula was too wet so it made the buttercream goopy. I just wiped it on a tea towel after each drag. -For this technique, I used the Wilton 806 tip which is a plain round tip. It worked perfectly. One website suggested filling a Ziploc bag with icing and cutting off the tip for a makeshift icing bag. It looked like it worked well for the woman in the video but I prefer the Wilton icing bag and tip as the bag is much larger and can hold more icing. Here's the final product. What do you think?
I iced this cake right on the cake pedestal so I wouldn't have to move it. It worked fine since you can easily rotate the cake as you go. This technique is not difficult. The best advice I can give you is to give yourself plenty of time. Don't be in a rush because this technique is time consuming. Block off some time so you can settle down to the task of icing your cake without feeling rushed. I was really pleased with the results but since I learned so much along the way, I'm eager to try it again to make it even better. When I saw my beautiful niece with her first birthday cake, I knew it was all worth the effort and she didn't seem to notice any flaws!
Have you ever tried the petal cake? What's your favourite way to decorate a cake?
Comments